

Paper Bag Album Instructions
 If
you want to know how to make an cheap but funky mini book, you're at the right place.
I love Paperbag Albums! I've made quite a few so far for my
for my family and friends. Most of them feature my daughter Atiria in her first
few years. Yay!! All those millions of photos of her are put to good use. I've
also pre-made albums complete with embellishments for my friends where all they need to do is add the
photos and their own journaling and any other personal touches.
If
you want to know how to make an cheap but funky mini book, you're at the right place.
I love Paperbag Albums! I've made quite a few so far for my
for my family and friends. Most of them feature my daughter Atiria in her first
few years. Yay!! All those millions of photos of her are put to good use. I've
also pre-made albums complete with embellishments for my friends where all they need to do is add the
photos and their own journaling and any other personal touches.
They are so easy to make and my favourite feature about them would have to be that each paperbag provides cute pockets to hold extra tags and photos, or even special memorabilia like ticket stubs, show programs, even paintings and drawings.
You can use any size paper bags. I like to make an album with 3 paper bags that measure approximately 12"x6" This will create an album around 6"x6". You can use much larger or smaller bags as you see fit. To make a super mini album use bags around 3"x3". You can even purchase paper sacks in a variety of different colours. Although if I want coloured bags I would simply paint them with acrylic paint.
Different Paper Bag Book Tutorials

How to make a Paper sack album
This is a tutorial for making the most basic of all the paper bag album
variants. Definitely a must try for novice and expert album makers alike.

Purse paper bag album instructions
Turn your ordinary everyday
lunch bags into this purse shaped mini album. A perfect album to make
for yourself or to present as a gift for the girl who has
everything.
Waterfall paper bag album tutorial
Called a waterfall because of the way the pages cascade and grow longer just like a waterfall.

A tutorial to make a yearly calendar that will stand on its own. It is made with 12 mini bags and a couple of binder rings.
Buy a blank paper bag mini book ready for you to decorate on Ebay!!
All the hard work is done so that all you need to do is embellish it!
Basic Paper Bag Album instructions - Step by step directions
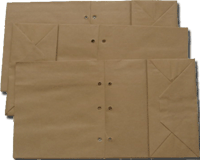
Materials
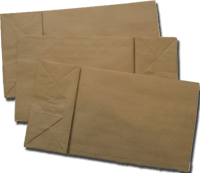
- 3 Paper Bags (any size)
- Hole punch tool
- Eyelets, book rings, ribbon
or fibres to bind
- lots of good stuff to cover and embellish your pages
| 1. Take your 3 paper bags and lay them on top of each other alternating the ends. |
|
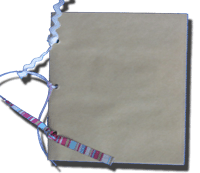
| 2. Fold them in half to create a book. Notice how the three open ends each
form a pocket. Punch three to five holes along the spine. |
 |
| 3. Set an eylet in each hole and / OR thread a couple of lengths of ribbon or fibre (or a combo of both!) through each hole and tie off. |
 |
| 4. Decorate your album as you choose using a variety of papers, embellishments, ribbon and any other creative elements in your scrapbooking stash. |
 |
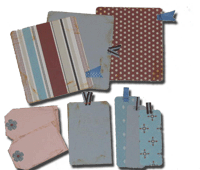
| 5. Create at least 3 large tags slightly smaller than the album itself to fit into the three pockets formed by the paper bags. Use them to hold extra photos or journalling. |
 |
Paperbag Album Tips
- I sometimes find it easier to decorate each page of the album before I bind it together.
- Try different binding methods like, bind-it-all o-rings, paper binding, metal binding clips, brads, eyelets, book-rings, Japanese stab binding or ribbon.
- Try some of these great Scrapbooking Journaling techniques, to help you when compiling your mini album.
Check out some paperbag albums examples
 |
Baby Shower Paper Bag Album Great mini album to make for a gift for a new mom to be.
|
 |
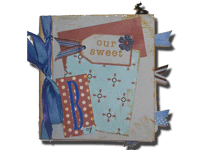
Pregnancy Paper Bag Album A journal type mini book to record some of those special moments and memories throughout a womans pregnancy. |
 |
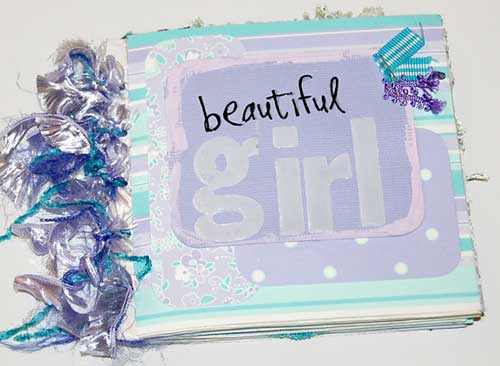
The queen of the teens. a mini book for your daughters and neices. |
 |
SUPA Stand Up Purse Album It looks just like a hand bag... |
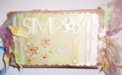 |
Simply us paper bag scrapbook A minibook about being a couple in love. |
 |
Wine
tour scrapbook This one is actually made out of the paper packaging from the winery that Andrea visited. |
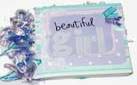 |
Baby scrapbook album Babies, beautiful babies. One for a special little girl made with darling Chatterbox papers. |