

Star Album Instructions
"These Star albums instructions are a great, glad I found them"

Star albums are awesome mini albums that open up into a star shape that you can open and display nicely on your mantle. If you add a ribbon closure it will sit nicely and makes a great talking piece around the coffee table. They are heaps of fun to make as well but they can take up a fair bit of of your cardstock and patterned paper so make sure you have plenty before you get started.
Materials
-
6 pieces of cardstock measuring 11½" x 5¾"
-
6 pieces of cardstock or patterned paper measuring 9" x 5¾"
-
6 pieces of cardstock or patterned paper measuring 8" x 5¾"
-
2 pieces of cardstock measuring 5½ x 5½ (front and back cover panels)
-
2 lengths of ribbon to tie off album
-
Paper trimmer or craft knife and metal ruler
-
bone folder or similar
-
Adhesive
-
Pretties...
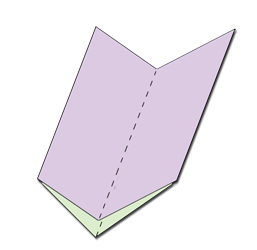
| 1. Trim 6 sets of the following 3 pieces and fold each piece in half as shown in the diagram |
 |
| 2. Embellish the Front pages with photos and
embellishments as desired
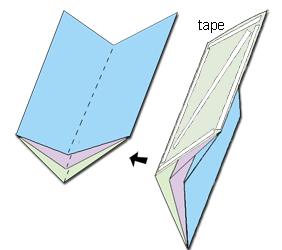
4. Once your pages are embellished then you may begin to assemble the album. Run some wide double tape along the two sides of the back page. |
 |
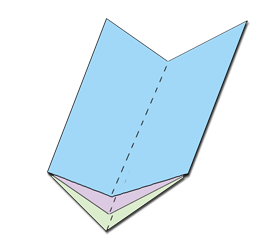
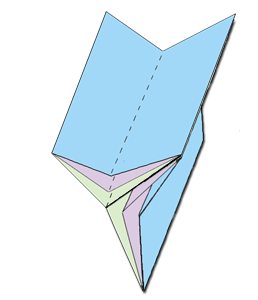
| 5. Carefully adhere the middle page to the back page as
shown in the diagram
6. Repeat for each set. |
 |
| 7. Now repeat steps 4 through to 6, this time sticking the front pages to the middle pages. |
 |
| 8. Once all 6 sets have been assembled, adhere each
set to the next using strong wide (1/2") tape.
|
 |
| Make sure you DO NOT stick the Front cover to the Back cover. |
 |
| 9. Once all 6 sets have been assembled, trim 2 pieces of
cardstock for the front and back cover panels and decorate each panel as
desired.
10. attach one length of ribbon to the front cover so that it is hanging over the edge. attach the Front cover panel to the front cover securing the ribbon in place. Repeat for the back cover
|
|
| Done. Your finished album should look something like this. |
|
Tips
-
Experiment a little. You can try embellishing the middle pieces as well as the front pieces.
-
Use only the back and middle pieces if you are short on paper.
Return from Star Album instructions to see more scrapbook mini album instructions
See some star album examples in the mini album gallery