

Christmas Tree Decoration album
Christmas is almost upon us again and it's time to start making our xmas cards and mini album gifts for our friends and family.
 |
I made this cute little tree ornament the other day and just had to turn it into a mini album . I wasn't too sure how it would work out and if I would like the end result but I must admit it turned out a lot better than I expected. I am heading to NZ for xmas with my daughter this year and I wanted to make a groovy ornament for the tree since I missed the big family xmas last year where each family member was asked to provide 1 ornament each to hang on the tree. My partner won't be joining us for xmas this year so it will be good to have him hanging on the tree.
Christmas tree ornament album instructions
Supplies
- Christmas ornament template (PDF)
- Printer
- Scissors, adhesives
- Scrapbook Paper
- Firm cardboard
- Ribbon and other embellishments
Directions
Step 1. print of the pdf template and cut out the desired size.
Of course you can use your own shape if you wish. just make sure it is symetrical shape
any of the following will work fine.
Step 2. Use the template to cut two shapes from some stiff card - I actually used bazzill which isn't that thick at all but it turned out ok - I did use basic grey patterned card instead of paper to cover the mini which lent the end product a bit of firmness Step 3. Now take the template and cut four shapes from your selected patterned paper. We will use these four panels to cover the the entire ornament once it is assembled. I cut two from 1 patterned scrapbook paper and the other two from co-ordinating paper for variation. |
|
|
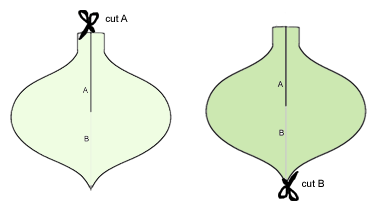
| Step 4. Make a cut on the first shape through line A to create the top slot on the first shape and through line B to create the bottom slot on the second shape. |
|
|
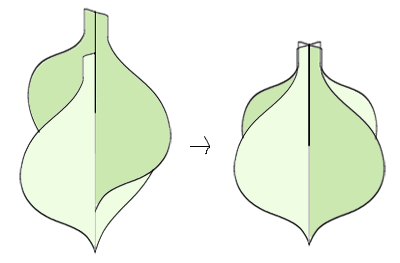
| Step 5. Take the second shape and slip it over the first shape to create our xmas decoration. |
|
|
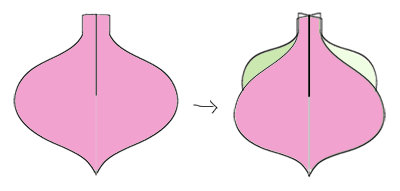
| Step 6. Lie the ornament down flat and glue the first panel (represented by the pink layer below) to the ornament being careful to make sure that the edges meet. Flip the ornament over and glue the 2nd panel on the opposite side. |
|
|
| Step 7. Reposition the ornament to glue the third panel down. place a short length of ribbon at the top between the ornament and the third panel and glue down. fold the ribbon over to the opposite side and glue the last panel on to the ornament securing the ribbon loop at the same time. |
| Step 8. Decorate each panel with small photos, rubons, stickers etc. |
I really hope these instructions made sense. have fun.
Check out pictures of the completed mini album
Related Mini Album Projects