

Library Pocket Mini Book Instructions
These Library pocket mini book instructions complete with library pocket template in PDF format will keep you busy for a few hours.
main ingredients
- Library Pocket Template
- 6 large library pockets assembled from the library pocket template- (5½" x 4")
- 6 tags approximately 5½"x4"
- 3 pieces of cardstock to measure 11¼" x 4"
- 1 piece of thick card 12 x 4½ approx
| 1. Using the template provided, make 6 large library pockets. Each pocket will measure 5½" x 4" when assembled |
|
|
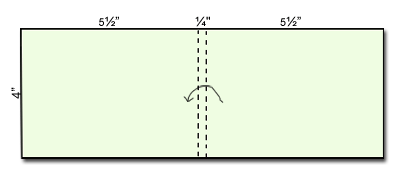
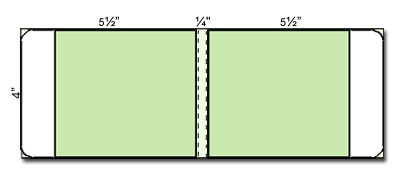
| 2. Trim a strip of cardstock to measure 11¼" x 4". Score a fold 5½" from the left hand edge. Score another fold 5½" from the right hand edge. Fold both sides in towards each other to form two panels separated by a small spine. |
|
|
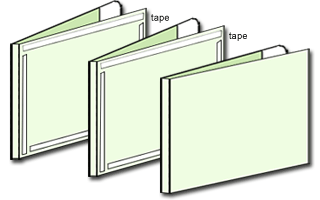
| 3. Take two pre-made library pockets and adhere the first one to the left hand panel with the pocket opening facing towards the outer left hand edge. Adhere the second pocket to the right hand panel. |
|
|
| 4. Repeat steps 2 and 3 twice.
Now you have 3 pages. fold the pages in and use double sided tape to adhere the three pages together to form a strong inner book. |
|
|
|
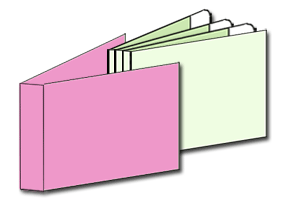
5.
Cut the book cover from some firm card board. The cover will measure
approximately 12" x 4½" cover with patterned paper. Score a fold 5½" from
the left hand edge. Score another fold 5½" from the right hand edge. Fold
both sides in towards each other. Apply some glue to the spine and the outer covers of the inner book (alternatively you may choose to use double sided tape) Attach the cover to the inner book to complete your library pocket mini book. |
|
|
| Cut six tags no bigger than 3¾" x 5¾" large.
Embellish tags as desired and place one in each of the pockets. Tip: before attaching the cover you can slip in some ribbon to tie the book closed. |

Return from library pocket mini book instructions to see more mini album instructions