

How To Make a Perpetual Calendar
This fabulous Perpetual Block Calendar tutorial was created for us by Wayne Jarvis (aka woodshed) He is a woodwork crafter that has been producing quality wooden jewelry boxes, toys, furniture and other stuff for a number of years now so he sure does know his stuff. He currently produces these perpetual block calendar sets which he sells from his Etsy store that are just begging to be covered in pretty scrapbook papers and given as gifts or kept for yourself on your desk at work.
The great thing about these calendars is that they can be
given as gifts all year round and customized to suit the recipients tastes.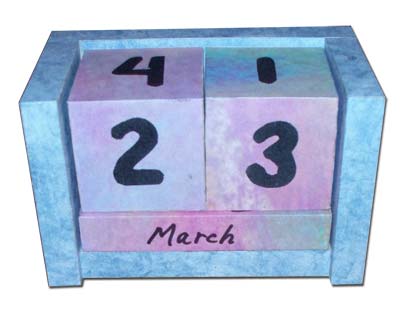
Materials
- Wood of your choice, ½" thickness works best, wood glue
- Small brad nails 1" length.
- Tools, saw to cut pieces, hammer, ruler, pencil.
Directions
Step one
Select your wood and prepare for cutting to size. We will be using ½" thick for this tutorial.
Step two
- Cut 1 piece for the back 4 1/8" long and 3 3/8" wide
- Cut 1 piece for the bottom 4 1/8" long and 2 1/8" wide
- Cut 2 pieces for the sides

Assembly,
Step
threeSand all parts smooth with 120 grit sand paper. Attach the bottom to the back with the edge of the bottom against the lower edge of the back, apply glue and a couple of brad nails.
Step
fourattach the two sides to the outer edges of the bottom and back assembly, apply glue and brad nails. This will be the final assembly of the holder. After glue dries sand all sides smooth. You can also add small feet under if you like to raise it up a little. Felt works well also.
Finishing
Step five
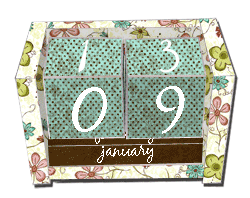
Choose how you would like to finish your calendar. You may like to paint, stain, or cover it with paper.
Step six
After the finish is applied you can apply the numbers to the cubes. You can either paint the numbers on, use number stickers or rub-ons, write them on with a permanent marker or any other method you choose.
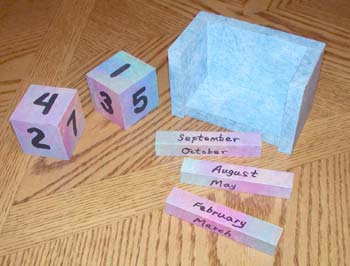
When numbering the days
on the cube you must do as follows.- One block must have a the numbers 0,1,2,3,5,6.
- The second one must have numbers 0,1,2,4,7,8.
This will give you the right combination to work.
The number 6 will also double for the 9.Step seven
Label the month blocks in the same fashion as you labeled the day cubes. You will have three blocks with four surfaces each for you to write a month. Each surface measures 4" x ¾". A handy way to label these blocks is to use your computer to type up each month ensuring that they fit into a rectangle slightly smaller than the surface. Print them all onto 1 sheet of scrapbook paper, cut them out and stick them to the blocks with glue or double sided tape..
Hot Tips and notes
If you have access to some power tools it is nice for the cutting. If you don't have these 'make life easier tools' you might want to head on over to Wayne's woodshed and purchase a pre-cut perpetual calendar kit which you can glue together yourself OR you can purchase an assembled perpetual calendar set with the holder completed.
It sounds like a lot of work but it is a lot easier to make than it actually seems.
Buy this Calendar Kit from Wayne here
Related Links
More Scrapbook Calendars
Paperbag Calendars
Return from How to make a perpetual calendar to home