Chipboard mini album instructions
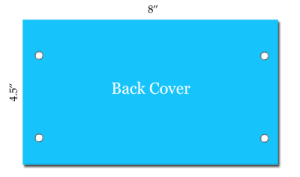
These chipboard mini album instructions give you one idea of how to make a great mini album from rectangular shaped chip board. Of course there are 10 million other ways to make a chipboard album but we'll cover those in due course. lol. For this mini album I used 4 pieces of acid free chipboard from deja views. Each piece measured 8"x4.5" but you can use any sized chipboard sheets. Just adjust the cuts as you see fit. These mini album directions use the above measurements throughout.
Im going for an irregular look with this mini album. It will be binded on both sides using book rings or jump rings. The album will open up on both sides and each page will be cut to a different size. This will lend the album a more interesting look.
Chipboard Mini Album Instructions
First of all we'll cut each of the chipboard pieces to size and will punch the holes will will later use to bind the whole thing together.
Take your four pieces of chipboard and cut them to size as per the diagrams below. The holes are placed approximately 1" from the top and 1" from the bottom of each page. Punch the holes on one sheet first then use that piece as a template and place it upon each of the other sheets to determine where each hole should be placed.
Once each piece is trimmed cover each piece with patterned scrapbooking paper. Alternatively you may choose to paint each section. Assemble the album together laying each of the pieces one on top of the other in order and bind together with book rings or maybe jump rings. Embellish your mini album as you wish. |