

Acrylic Mini Album Instructions
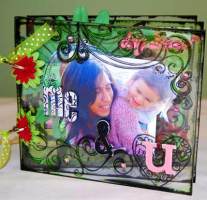
Making this Acrylic mini album was a blast. Although I had to get out the electric drill and do a bit of make shift DIY to extract four pages from a sheet of acrylic I didn't do too badly. Sure, each of the pages vary in size and the holes I drilled are in different spots but that is just the beauty of hand made items isn't it? All those little imperfections just adds character to your album as Kelly would tell me. Anyways it all came together in the end and I'm quite happy with the result. You can view my completed acrylic mini album here.
 |
I simply Purchased a 10"x48" off cut sheet of acrylic (3mm or 1/8" thick) that I found in an aisle at Bunnings Hardware store. Because it was an off cut I was able to buy it for $10AUD, the full size sheet would normally cost between $40-$70AUD.
A 3mm sheet is quite thick. A thinner material of 1-2mm would allow you to use a craft knife or even your Paper trimmer to cut the pages to size and you would be able to Punch the holes for the binder rings with your regular hole punch tool. As it was with this album I was required to drill the holes with an electric drill and to use one of a number of methods to cut the pages from this thick sheet. I don't have access to a saw of any kind so I used a score and break technique to cut my pages. You can always enquire at the hardware store if they will cut it for you for free. Some stores may charge a nominal fee per cut.
Materials
Acrylic Sheet
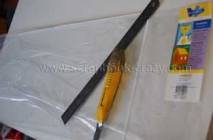
Acrylic scoring tool - I used an old utility knife I found lying around in the
garage.
Marker
Metal ruler
Sand paper or micro torch to polish the edges
Preparing the album
1. Measure the pages for our acrylic mini album using a pencil and a ruler
2. Score a line where you intend to break the sheet. Place your ruler up against the line you wish to cut. Draw your utility knife along the ruler to score a line. (I don't know how many times you should score it but I did this about 10 times just to make sure It would break and I had no problems)
3. Place your sheet on a bench or table with a straight edge with the scored line hanging slightly over the edge. Press down sharply on the sheet to break it along the score line. It's a little bit scary at first but it is really quite easy - I put on a pair of protective glasses just in case)
4. Measure and drill your holes no less than 1/2" in from the
margin of your pages.
If your sheets end up uneven like mine did, use your first page as a template.
Place it on top of each page making sure the outer edges of the pages meet (the
opposite side to where the holes will be) and mark your drill spots.
Tip. To prevent chipping when drilling your holes, start with a smaller drill bit and work your way up to the larger drill bit.
The height of my album is 5.5" and two holes are drilled 1.5" from the top and bottom.
Polishing the rough edges
Sanding: Smooth the edges with rough sand paper finishing with fine wet and dry sandpaper. For a flatter straight edge use a sanding block and for a rounder edge use hand sanding
Torch: For acrylic sheets 1/8" or 3mm thick and greater you can use a mini torch or a Creme Brulee torch to polish the edges. You can also try a barbeque lighter. Be careful when using this technique and allow for the acrylic to cool before handling.
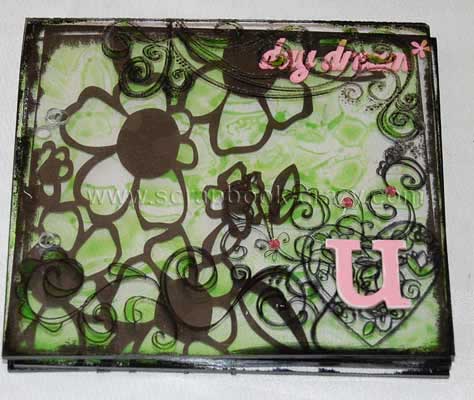
Embellishing your acrylic scrapbook
| Now this is where the good stuff happens. Sky is the limit. I had so many ideas that I wanted to incorporate into my album (some original but most of them scrap-lifted) But I only needed to use a few. Because you can see the embellishments peeking through from all the other pages you don't need to do much at all to pretty up each page. It was quite a challenge trying to place your elements to create the best effect (It is even more challenging trying to keep the acrylic clean) |
|
List of Acrylic mini album friendly products:
-
Rubons
-
Bling - mobile phone bling, swarovski flat back crystals, nail art
-
Rubber or Acrylic stamps
-
Stazon ink (dye based inks will not work with acrylic)
-
Embossing powders and pigment ink - heat embossing works well but be
-
Stickers and other adhesive embellishments
-
Heidi swap masks
-
Glass Paint
-
Permanent Markers
-
Acrylic Paint
-
Transparencies
-
Heidi Swapp ghost letters / shapes
-
Plastic paints
Tips
-
Photos: I paired my photos up and printed each pair to be the same size so that I could stick the first photo to the front of a page and the second in the exact same spot on the back of the page. This allowed me to not be restricted to having to place embellishments to cover the backs of photos.
-
Acrylic is flammable so be careful when heat embossing. Make sure it is on an even surface and give it plenty of time to cool before you handle it again.
-
Also when heat embossing make sure the surface is clean and dry so that the powder only sticks where it is supposed to. Use a bit of baby powder on a dry cloth to help prepare the surface.
Hot TIP - make your own glass paint
-
Make your own glass paint by mixing a small amount of Glossy Accents and a drop or to of your favourite colored dye based ink!!! Just one more reason to love an already fabulous product. I heart glossy accents (similar to dimensional magic)